Introduction
Cloudflare Argo Tunnel is a new feature that allows Cloudflare to validate your website and automatically provide data encryption for in-transit data. It also has the ability to encrypt all the data for your domain, even if you don't use Cloudflare DNS or SSL.
This article will show you how to get started using Cloudflared with Synology DiskStation Manager. By following this guide, Cloudflared will be installed in a Docker container to make your NAS more private and secure.
Nota bene :This article is not limited to Synology DSM , but is general for any system that has Docker
Requirements
Before we start, you should make sure of some basic requirements that must be available before starting :
- Docker should be installed so (Docker.sock) can watch for changes when running in daemon mode
- Subway container must be able to communicate with other containers.
- Domain name is required
- Cloudflare account is required
- Your domain must be managed by cloudflare (change your authoritative nameservers (NS Records))
?Important things to note
- In the label.hostnames, you can only use the domain you choose to authorize.
- subway.hostname ( Adding containers paragraph )
- subway.port (Adding containers paragraph )
Features
- No need to create dns record or tunnel manually
- No need to touch your router / firewall or expose your ports
- No need for nginx proxy manager
- Bypassing a CGNAT
- More secure and private
- Subway container connects to the Docker daemon, and if a container with the subway.hostname label is active, the tunnel and related DNS are instantly updated.
- Subway container will establish a Subway tunnel for the hostnames supplied in the subway label.
- Subway container will generate a DNS mapping in the cloudflare DNS to the tunnel UUID based on the hostname.
Create network
Subway containers must be able to communicate with other containers, as stated in the Requirements section. for that, we'll create a network named argo, and then link all of the containers we want to that network.
- Are you a Synology user (GUI)
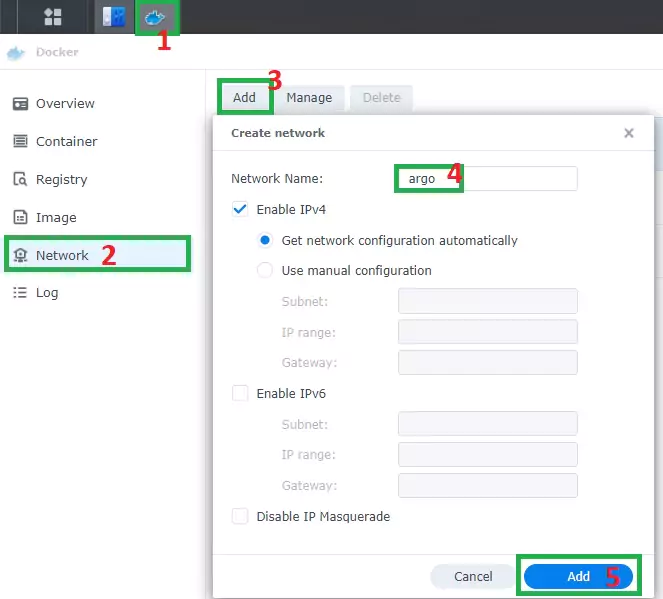
Click on docker icon and go to network menu after that click on add as mentioned below
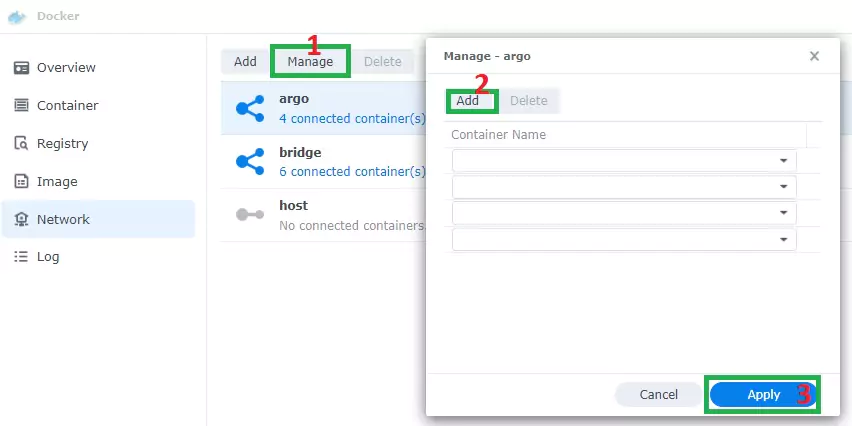
Once you've created a new network, select argo network and click on Manage then click on Add after that select which container you want, picture below resume what we described
- Are you fan of CLI (Terminal)
Use the command below to create a new bridge network
sudo docker network create -d bridge argoNow let’s connect our container to argo network, to do that use the command below
sudo docker network connect argo name_of_container
Installation
Installing Subway container is a simple process, as it only requires a few steps to be completed:
I am attempting not to make this article a monopoly for Synology users only, but rather to everyone who owns any system that supports Docker, thus you'll see that I'm describing both using GUI and TERMINAL commands. I also divided the instructions into stages to make it easier for everyone to comprehend and install the subway container.
- Task Scheduler
- Terminal
- Docker compose
- Portainer (Stack)
Task Scheduler
Open the Docker folder from File Station. Make a new folder called subwaywithin the docker folder. Follow the steps outlined in the diagrams below.

Go to Task Scheduler / Create / Scheduled Task / User-defined script in the Control Panel. Follow the steps outlined in the diagrams below.

A new window will popup once you click on User-defined script. Follow the steps below to get started:
- General : Enter task name ex “Install Subway” in the Task area. "Enabled" should be unchecked. Choose root User from the options.
- Schedule: Select Run on the following date then select “Do not repeat“.
- Task Settings: Check “Send run details by email“, add your email (Optional), then copy paste the code below in the Run command area. After that click Red button OK
docker run -d --name=subway \
-v /var/run/docker.sock:/var/run/docker.sock \
-v /volume1/docker/subway/:/data:rw \
--restart always \
--network=argo \
--hostname=subway \
mikeburgh/subway:latest
Trought Terminal
Please see the post on how to access ssh if you want to use it instead of the graphical way.
- How to connect to your Synology via ssh
- After you've successfully gained access using ssh,
- Create the subway folder in the location where you organize your containers, in my case:
mkdir -p /volume1/docker/subway/After you've created your folder and subfolders, execute the docker command:
sudo docker run -d --name=subway \
-v /var/run/docker.sock:/var/run/docker.sock \
-v /volume1/docker/subway/:/data:rw \
--restart always \
--network=argo \
--hostname=subway \
mikeburgh/subway:latest
Trought Docker compose
Prerequisites?
Check to see if Docker Engine and Docker Compose have already been installed.
After that, create a new file named docker-compose.yml in the same directory as /volume1/docker/subway and paste the code below into it.
version: '3.3'
services:
    subway:
        container_name: subway
        volumes:
            - '/var/run/docker.sock:/var/run/docker.sock'
            - '/volume1/docker/subway:/data:rw'
        image: 'mikeburgh/subway:latest'
        network_mode: argo
hostname:subway- run the following command using the docker compose command:
test@NAS:/volume1/docker/subway$ sudo docker-compose up -d
Creating subway... done
This command will download and install all of the necessary dependencies for subway container.
After the installation has finished, you can verify that it was successful by running:
sudo docker ps -aTrought Portainer
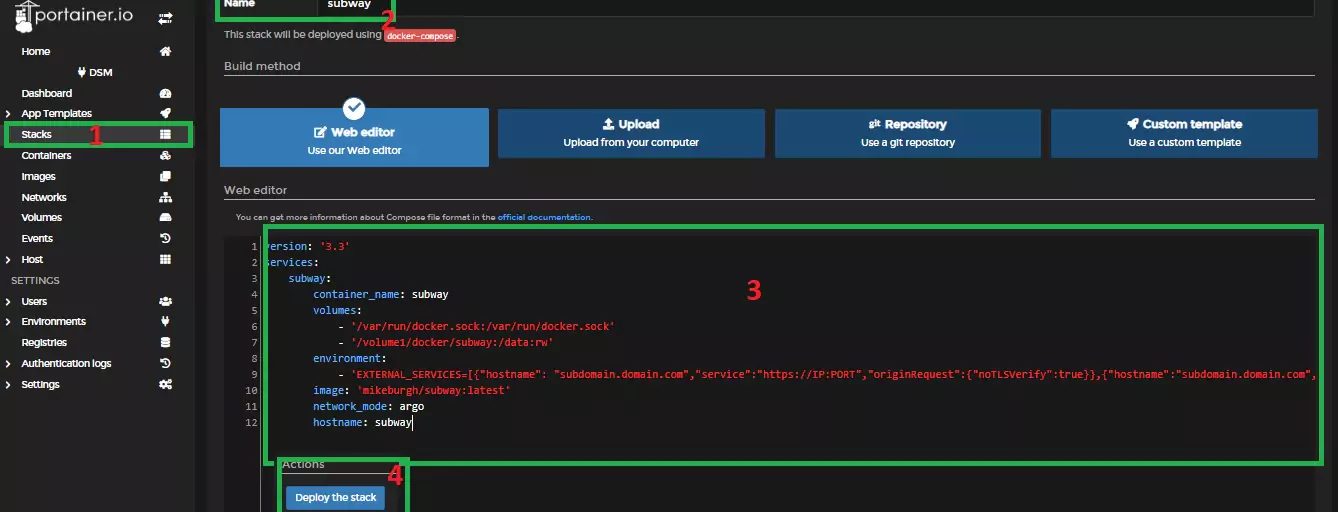
I prefer to use the Stack option to organize my Docker composes. This allows me to store, edit, and manage all of my Docker composes with Portainer.
- Note: If you've never heard of Portainer or are unfamiliar with it, this post how to install Portainer, will walk you through installing it and managing all of your Docker containers. with the use of a graphical dashboard
- After you installed Portainer, Go to your Portainer interface http://YOURSERVERIP:9000
- Enter the username and password for your credential.
- Click the Stacks option on the left side of your screen.
- Click the +Add stack button, then paste the docker compose we used for docker-compose.yml then hit Deploy the stack button, follow the steps outlined in the diagrams below
Configuration
After you've successfully installed subway container, we'll use the logfile on subway container to authorize our domain to obtain Argo Tunnel certificates.
Are you fan of CLI (Terminal)
To accomplish that run the following command:
sudo docker logs subwayThe output should be similaire to this
2022-04-07T12:15:11Z SUBWAY Loging into cloudflared
Please open the following URL and log in with your Cloudflare account:

https://dash.cloudflare.com/argotunnel?callback=https%3A%2F%2Flogin.cloudflareaccess.org%XXXXXXXXXXXXXXXXXXXXXXXXXXXXXXXXXXXXXXXXXXXXXXX

Leave cloudflared running to download the cert automatically.
Are you a Synology user (GUI)
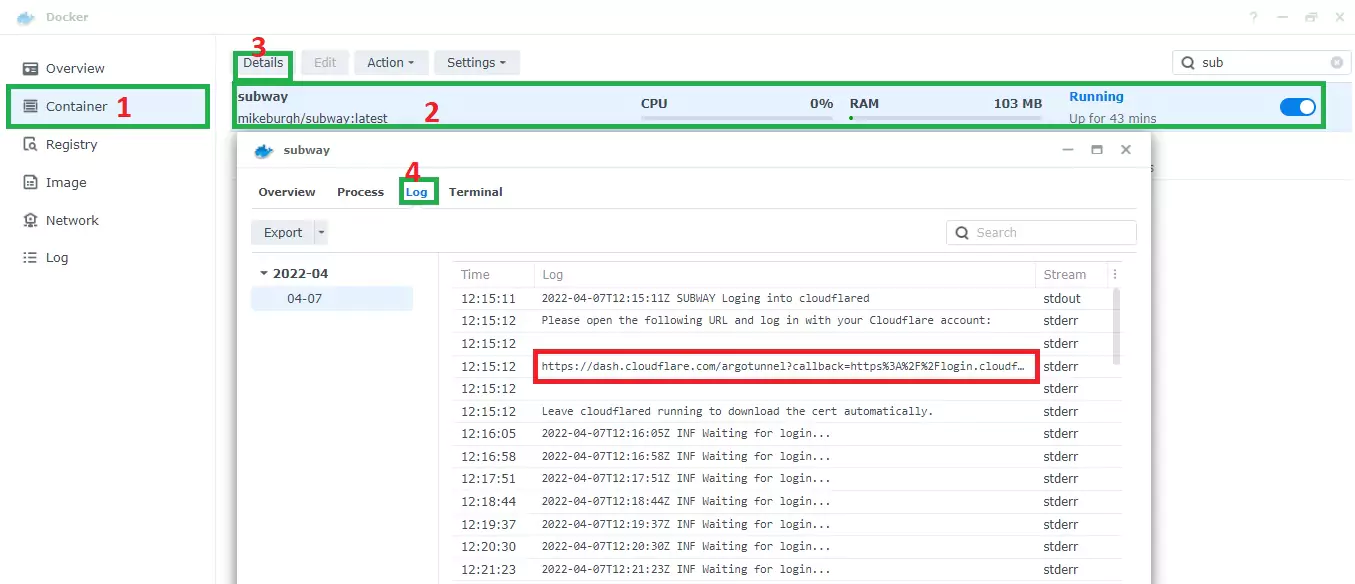
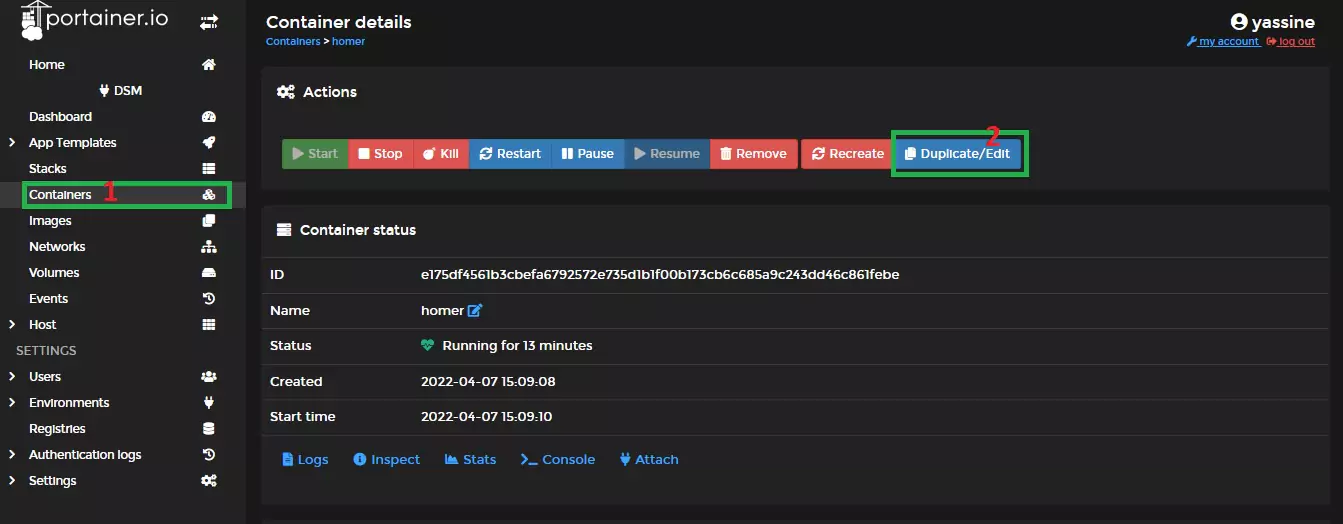
Click on docker icon then go to Containers menu after that select subway container, select Details then log as seen below
Are you a Portainer user (GUI)
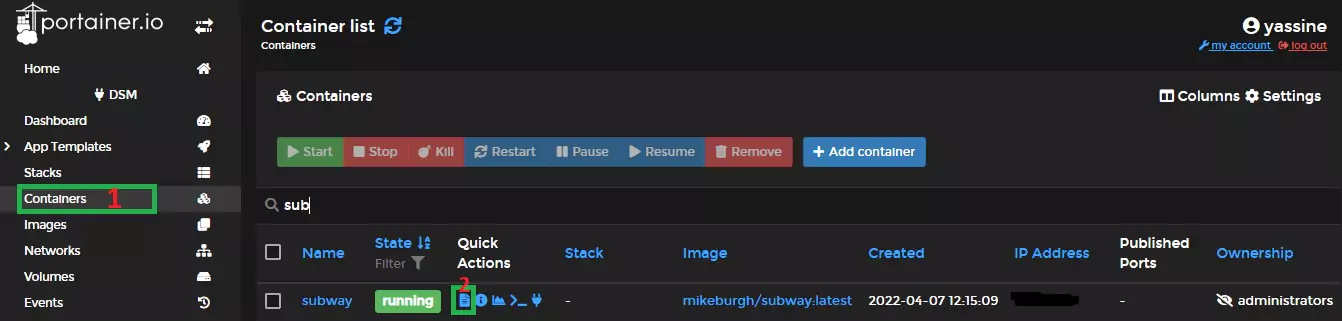
Once you've gotten the result, copy the "URL" and paste it into your browser.
You will be redirected to a page similar to the one below.

Click on your website's domain. A window will appear asking you to authorize the cloudflare tunnel in your domain.
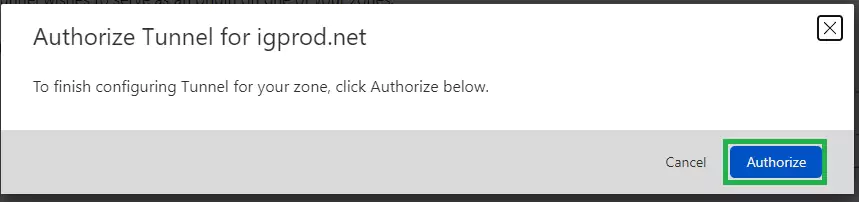
Once you've authorized the cloudflare tunnel, it will create a tunnel called subway in Cloudflare Zero Trust Security and will automatically download a certificate called cert.perm to the location where you previously created a subway folder.
Adding containers
In this example, we'll show you how to use docker cli to add label entries also from through the portainer GUI, unfortunately, this option is not available in the synology docker GUI.
We'll use the Homer container as an example, but before, here's what you need know.
The following are the two most essential entries to include as labels in your container:
subway.hostname=subdomain.domain.comsubway.port=8080(port using by homer container)
Docker CLI
sudo docker run -d \
  -p 8888:8080 \
  -v /volume1/docker/homer/assets:/www/assets \
  --label subway.hostname=dash.igprod.net \
  --label subway.port=8080 \
  --restart=always \
  --hostname=homer\
  --name=homer \
  --network=argo\
  b4bz/homer:latest
Docker Compose
version: '3.3'
services:
    homer:
        ports:
            - '8888:8080'
        volumes:
            - '/volume1/docker/homer/assets:/www/assets'
        labels:
            - subway.hostname=dash.igprod.net
            - subway.port=8080
        restart: always
        container_name: homer
        network_mode: argo
        image: 'b4bz/homer:latest'
Using Portainer to add Label
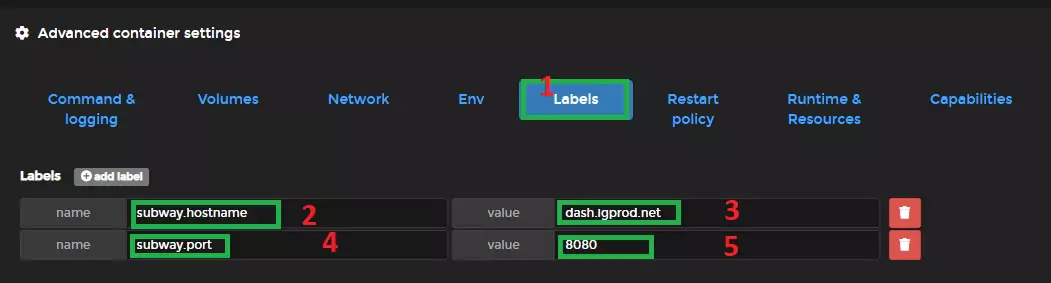
Go to Portainer interface, select containers and click on homer container, after that hit Duplicate/Edit bouton, select Labels option and add the following informations as seen below then click Deploy container bouton:
⚠️ Enter your own subdomain and port.
Once you've deployed the container using the above information, you'll see that a new DNS cname record has been generated in your cloudflare account, and the homer container has been added to the sybway container's config.yml, as shown in the log.
2022-04-07T15:09:10Z SUBWAY Container homer found with status start and subway.hostname dash.igprod.net...
 - Checking connection to xxx.xxx.xxx.xxx:8080. Connection to xxx.xxx.xxx.xx 8080 port [tcp/http-alt] succeeded!
 - Adding dash.igprod.net to tunnel via service http://xxx.xxx.xxx.xx:8080
2022-04-07T15:09:13Z INF Added CNAME dash.igprod.net which will route to this tunnel tunnelID=xxxxxxxxxxxxxxxxxxxxxxxxxxxxxxx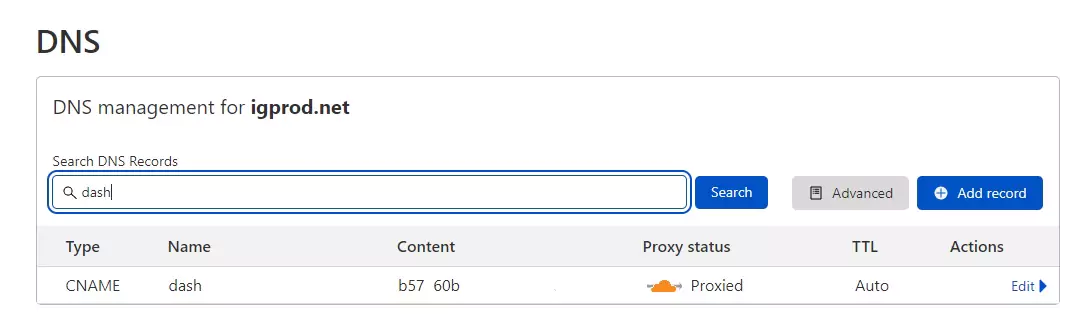
Services out of docker ?
For example, DSM? You're probably wondering how we can make our resources private via cloudflare tunnel if they're not containers. That's correct, I asked myself the same question.
Simply we'll utilize the EXTERNAL_SERVICES environment for this.
Docker CLI
docker run -d --name=subway \
-v /var/run/docker.sock:/var/run/docker.sock \
-v /volume1/docker/subway/:/data:rw \
-e 'EXTERNAL_SERVICES=[{"hostname": "firstservice.igprod.net","service":"https://localIP:Port","originRequest":{"noTLSVerify":true}},{"hostname": "firstservice.igprod.net","service":"https://localIP:Port","originRequest":{"noTLSVerify":true}}]' \
--restart always \
--network=argo \
--hostname=subway \
mikeburgh/subway:latest
Docker compose
version: '3.3'
services:
    subway:
        container_name: subway
        volumes:
            - '/var/run/docker.sock:/var/run/docker.sock'
            - '/volume1/docker/subway:/data:rw'
        environment:
            - 'EXTERNAL_SERVICES=[{"hostname": "firstservice.igprod.net","service":"https://localIP:Port","originRequest":{"noTLSVerify":true}},{"hostname":"secondservice.igprod.net","service":"https://localIP:Port"}]'
        image: 'mikeburgh/subway:latest'
        network_mode: argo
        hostname: subway
noTLSVerify . Default: false. Disables TLS verification of the certificate presented by your origin.
Conclusion
We Have Found the Best Ways for You To Connect Your Devices and Enjoy Online Privacy.
If you found this article to be really useful, please consider making a donation.❤️

Leave a comment
Your email address will not be published. Required fields are marked *